LCD PANEL
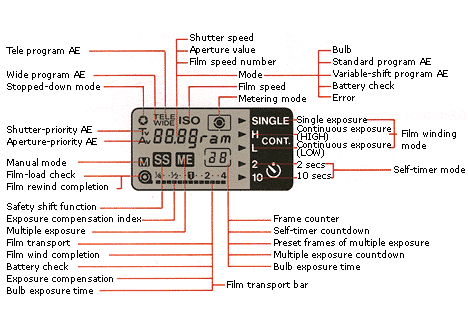
AE Mode Selection
Using the Electronic Input Dial and the Shooting Mode Selector, move to the desired AE
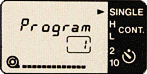
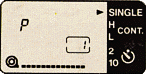
mode, as displayed on the LCD Panel. Choose from among: PROGRAM (Standard Program), P
(Variable-shift Program), Tv (Shutter-priority AE), Av (Aperture-priority AE), and BULB.
Variable-shift Program Selection
In the Variable-shift Program mode, use the Electronic Input Dial to move to any of the
seven available programs: TELE P-3, TELE P-2, TELE P-1, P, WIDE P-1, WIDE P-2, WIDE P-3.
Choose the most suitable program to suit the lens being used or the photographic effect
desired.
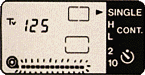
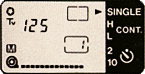
Shutter Speed Selection
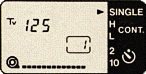
In the Tv mode, use the Electronic Input Dial to move to any of shutter speed from 1/4000
to 30 sec. in half steps, for a total of 36 settings.
Aperture Selection
In the Av mode, use the Electronic Input Dial to move to any of 20 aperture settings, from
f/1.2 to f/32.
Metering Mode Selection
Use the Electronic Input Dial and the Metering Mode Selector to set one of the three
metering modes, as displayed in the LCD Panel. Choose from among " " (center-weighted
average metering), " " (center-weighted
average metering), " " (partial metering), and " " (partial metering), and " " (spot metering). " (spot metering).
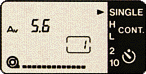
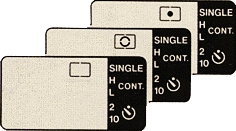
Film Winding Mode Selection
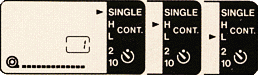
Use the Film Winding Mode button to move the arrow on the LCD panel to one of three film
winding modes: SINGLE, H (high-speed continuous 4.5 fps mode), and L (continuous 2 fps
mode).
Self-Timer Selection
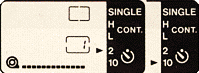
Use the Self-timer Button to move the arrow on the LCD panel to either 2 (2-second self
timer) or 10 (10-second self-timer). While the self-timer is operating, the LCD Display
Panel counts down the seconds and the Self-Timer Operation indicator on the front of the
camera blinks.
Exposure Compensation Selection
When the Exposure Compensation Button is pressed, the exposure compensation index appears
along the bottom of the LCD panel. Hold the button down while using the Electronic Input
Dial to move the dot to the desired exposure correction setting.
Multiple Exposure Selection
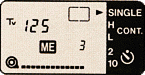
Use the Electronic Input Dial with the Shooting Mode Selector and Metering Mode Selector
to select the desired number of exposures on the current film frame. The ME symbol appears
on the LCD Panel along with the number of exposures selected.
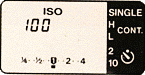
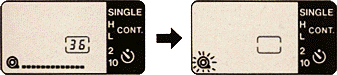
ISO Film Speed Selection
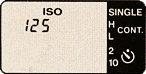
ISO film speed is set automatically (from ISO 25 to 5000--the entire DX-coded range) when
DX-coded film is used. To set ISO film speed manually, press the Film Speed Button and use
the Electronic Input Dial to select from among 31 ISO values (from ISO 6 to 6400)
appearing on the LCD Panel. The ISO symbol also appears on the LCD Panel.
Bulb Display
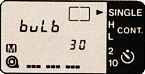
In the bulb mode, the LCD Panel counts elapsed time, with numeric display up to 30
seconds, and bar displays for up to three further 30-second increments (maximum time
counted: 120 sec.).
Frame Counter Display
The LCD Panel displays the frame number for the next frame to be exposed. (Number of
remaining frames appears in the viewfinder.)
Incorrect Auto-loading Warning Display
When a mistake is made in the auto-loading procedure, the film transport bars along the
bottom of the LCD Panel flash.
Film Load Check and Film Rewind Completion Indicator
The film cartridge symbol on the LCD Panel appears when film is being loaded, and when
loading is correctly completed, the film transport bars are displayed. On completion of
film rewind, the film cartridge symbol flashes.
Manual Mode and Stopped-Down Indicators
The M (Manual mode) indicator appears when the lens aperture ring is moved off the
"A" setting. If the stopped-down lever is depressed, the " "
(stopped-down) symbol appears. The error warning ("EEE") is displayed if
stopped-down operation is attemted with the lens aperture ring still in the "A"
position. "
(stopped-down) symbol appears. The error warning ("EEE") is displayed if
stopped-down operation is attemted with the lens aperture ring still in the "A"
position.
Battery Check Display
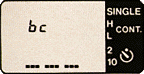
When the Battery Check Button is pressed, the "bc" symbol appears on the LCD
Panel, along with a three-bar display for battery strength (three bars for fresh batteries
down to no bars for exhausted batteries).
Safety Shift Indicator
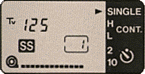
To set the Safety Shift function, hold the Film Speed Button and Exposure Compensation
Button down at the same time (for about one second). The SS (Safety Shift) symbol appears
on the LCD Panel.
| 
