Changing the Screen
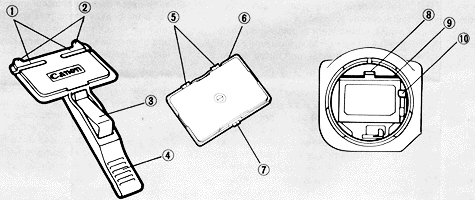
1. Holding Arms
2. Supporting Tab
3. Latch Release Lever
4. Handle
5. Tab
6. Groove
7. Tab
8. Latch
9. Cushion
10. Aperture Signal Coupling Lever |
 |
Canon offers eight different types of focusing screens for the T90, each designed for a
particular focusing requirement.
Using the focusing screen best suited to your needs will greatly facilitate viewing and
focusing. To change the screen, use the special focusing screen tool which is supplied
with each acessory screen. This tool is designed with "holding arms,"
whicheserve as springs to hold the screen in place during insertion and removal.
Therefore, it is possible to change the focusing screen without touching it.
The surface of each focusing screen has been specially treated to transmit the maximum
amount of light for the brightest possible viewing. To avoid marring its surface, never
touch the screen.
If fingerprints should adhere to its surface, it is impossible to remove them. If the
screen becomes dusty, the dust will not affect the pictures but it may make viewing
difficult. To clean the scree, blow off the dust with a blower brush, being careful not to
touch the screen's surface.
Removing the Focusing Screen
 |
| 1. |
First remove the lens from the camera body. |
|
|
| 2. |
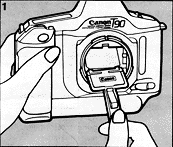
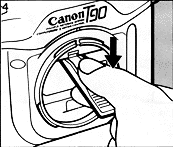
Hold the camera and the focusing screen
tool as illustrated. (1) Do not press the blue latch release lever. |
|
|
| 3. |
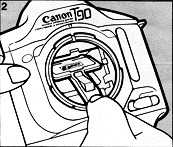
Insert the tool as shown.Being careful not
to touch the mirror. (2) |
|
|
| 4. |
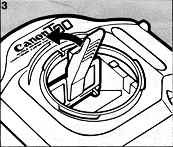
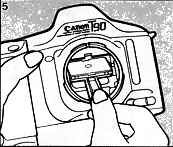
Slide the tool towards the rear of the
focusing screen so that the holding arms slide into the rear groove on the screen's frame.
Then lightly push the tool and raise the handle so the tool is held in place. (3) |
|
|
| 5. |
Press the latch release lever (4) and lower
the handle; the focusing screen will be attached to the tool. |
|
|
| 6. |
Remove the focusing screen from the camera,
being careful not to touch the mirror as you lift out the tool. (5) |
|
|
| 7. |
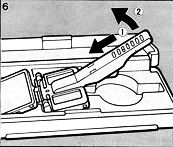
Turn the tool upside down and place the
screen in the compartment of the accessory screen case. Gently push the handle of the tool
forward (6-(1)) and lift it up so that the holding arms release the screen. (6-(2)) |
|
Inserting the Focusing Screen
 |
| 1. |
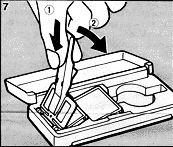
To attach the focusing screen to the tool,
lightly push the handle so the holding arms slide into the groove of the screen's frame
(7-(1)) and lower the handle until the tool locks into place. (7-(2)) Make sure the side
of the screen with the single tab is facing the latch release lever. |
|
|
| 2. |
So as not to touch the mirror or cushion,
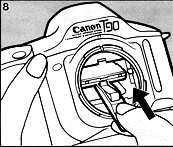
insert the tool from under the aperture signal coupling lever. (8) |
|
|
| 3. |
Slide the focusing screen into position
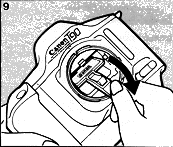
and, pushing lightly, raise the handle upwards; the screen will lock into place. Then,
pushing the handle forward, lower it and lift out the tool. (9) In this occasion, do not
press the blue latch release lever. |
|
|
| 4. |
Following the procedure in step 7 above,
transfer the unused screen, dull side down, to the storage compartment in the case. |
|
|

